

This was a fairly big and deep recommissioning.
One of those bikes that sat neglected for many a year. The aim of the game, as it always is, was reliability. This meant checking over all the those unseen parts and soon-to-be issues.
Good job too, most of what I checked needed sorting!

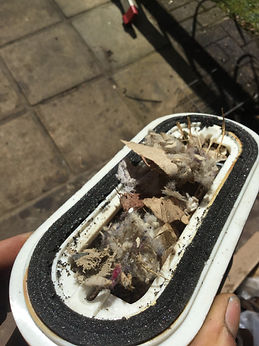
In this case it also had the misfortune of being worked on by someone who really shouldn’t have gone near it, more on this later. Upon looking it over and tearing it down, In the airbox, I found a mouse house complete with its petrified tennant, perished inlet rubbers, rusty fuel tank, dead-dead battery, the works.
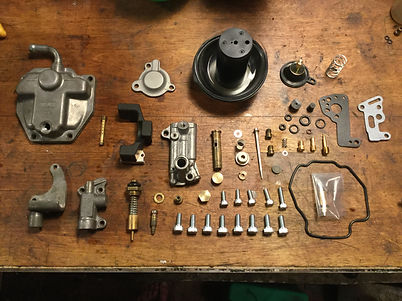
Carbs
Worst of all was the state of the carbs. Linkage seized absolutely solid, not quite seated in the inlet rubbers, bolts missing or loose and a darker shade of grey than they really should be. Quite a bad sign, someone or something has been in here. Removed and on the bench it only got worse, that dark gray, yep, dipped in an acid bath. In my humble opinion, under no circumstances should poor, defenseless carburetors be plunged, inlet first, into an acid bath. It’s barbaric, completely uncalled for. At least it explains why the poor things were stuck rock solid. Two slides were completely stuck, no amount of cleaning, soaking or gentle heating could free one of them. In the end I had to resort to violence in order to remove it, needless to say, it didn’t survive.
I can’t blame that one entirely on the careless buffoon who subjected this benign object to such terrible acidic abuse. It’s possible that the mouses’ en-suit was right above these inlets.
The culprit (the buffoon, not the mouse) had also taken the liberty of mashing up and rounding nearly every pilot jet in their respective holes, not to mention the mixture screws. I’m usually quite forgiving and give the benefit of the doubt to previous mechanics, but there was simply too much wrong here for mercy!


After much time, and a few well directed curses. All the destroyed pilot jets were out of their holes and after a long soak the butterflies started to move. With everything completely stripped, including removing the quirky pressed in float needle seats and plugs you’ll find on a Vmax. There was still much cleaning to be done, a session in the ultrasonic helped, but the usual green gunge wasn’t the problem in this case, they were actually quite clean at first glance. A deeper investigation found some of the fine fuel and air passages were blocked with corrosion, I wonder what caused this. Something acidic, possibly? (Before you go pointing fingers at that somewhat innocent mouse, there’s no way he was responsible here). Due to the twists and turns of those passages, I could never say for sure they’re completely clear of that horrible white powder. But with much effort, hours spent and various tools deployed, lets say I’m pretty confident there won’t be any issues in the future.

With everything clean, it was time to reassemble. Many, many new parts were needed in this case. All those mashed jets, the slide in 6 pieces, air cut off diaphragms, even the mixture screws. Nearly everything made of rubber was beyond use. The little rubber bungs you’ll find on these carbs had shriveled up and gone rock hard (I’m working on a much better solution, watch this space). These had been drained or leaked and stood dry for quite some time.
A top tip, leave those little bungs in a cap of fuel whilst working on the carbs to prevent them drying out, assuming they’re in good condition to begin with.
These were way, way past it. The main diaphragms were alright, but with one slide now deceased and another worse for ware, the decision was made to go with aftermarket slides. These came with new ones anyway. It was much more cost effective to get four aftermarket than two genuine. I wouldn’t suggest mixing the two types as it may affect performance.
Because of the inaccessibility of the float needle seats, I took the liberty of fitting FKM (Viton) O rings here and on the plugs before seating them, fitting the plugs and carefully peening them in. I will be putting together a complete Viton seal kit for these carbs when I find the time. The carb bodies were assembled on my surface plate and float heights checked and adjusted on my bench with a lightly pressurized fuel supply and a clear pipe.
A final, fine mist of ACF50 finishes the job nicely. The ultrasonic bath tends to dry things out, so a fine mist of this marvellous stuff can only do good.


In one piece and ready to go, much better.
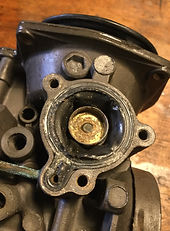
Everything else on this one was a piece of cake after that saga. When changing the fork seals, the stanchions found their way over to the lathe and got a light honing before being put back together with some genuine seals. The tank and whole fuel system was throughly cleaned and checked Including the fuel pump, which was perfect, unbelievably. The rubber diaphragm was, perfect. It barely needed a clean. How? It wasn’t a new part, unless the outside aged rather quickly. Conundrum aside, it was a welcome break. A coolant flush was in order, whilst there I thought it best to check the waterpump seal. Bikes of this age, it’s always something worth checking. Reliability is the aim after all. Lo and behold behind the cover lay a seal hanging by a thread and beyond; coolant, corrosion. A good clean and some nice genuine parts later (except the bearing, a nice off-the-shelf Koyo is kinder on the wallet) and all is well with the world.


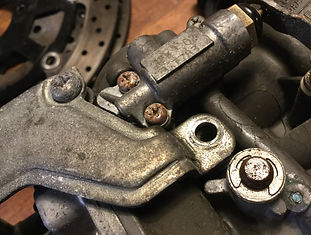
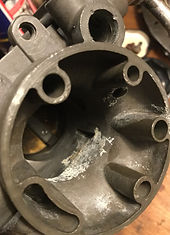
The inlet and V-boost assembly were next in the firing line. The V-boost suffered from the same seized butterflies, I believe this had been an issue with this bike before. A good soak solved the issue without too much pain. The inlets were in need of some attention, it was far quicker for me to clean them with a gentle shotblast, followed by a round in the bead blaster. I gave the mating surface a gentle lap on my lapping plate to ensure a nice flat sealing surface. There was a concerning amount of debris lurking around and down stuck in the four throats of this little beasty. Using some initiative I removed the spark plugs, worked out which cylinder had its mouth open and blew some compressed air down the sparkplug hole and out the inlet whilst picking out what I could see down in there. Once clean I’d tape it up and gently edge it over to the next cylinder. It worked rather well, if I do say so myself. All put back together with some FKM O rings where it really matters. Whilst in this deep the valve clearances were checked and adjusted. The real challenge here wasn’t adjusting the two offending valves it was cleaning the corrosion off the gasket surface without it going in the oil, all fun and games here.

All assembled with new inlet rubbers, mouse house removed, cables adjusted, all fluids (after a battle with some rather stubborn bleed nipples) and filters changed. Time for a fire up, after a tickle with a screwdriver and fiddle with my vacuum gauges, it sounds beautiful.
Few odd jobs later and a test ride is in order. I do love these machines, they’re ludicrous, completely unhinged, utterly bonkers pieces of engineering. No one in their right mind would have one… if anyone reading this is looking to part with theirs, I’m in the market.


